Illumination is one of the solutions we all seek whenever we want to improve mobility and security at night. Property owners will install automatic street light using solar panel to brighten up their streets and create a daytime experience. Commercial buildings use street light systems to light up their parking yards and compounds to improve surveillance.
हरित ऊर्जा आंदोलन ने उद्योग में एक बदलाव लाया है जहां स्ट्रीट लाइटें सूर्य से ऊर्जा से अपनी शक्ति प्राप्त करती हैं। सौर ऊर्जा एक विश्वसनीय और कुशल ऊर्जा स्रोत है, और दशकों से यह पारंपरिक स्रोत के लिए सबसे अच्छा विकल्प बन गया है।
सौर-संचालित स्ट्रीटलाइट्स की स्थापना में वृद्धि एक अच्छा संकेतक है कि सही उपकरण, ज्ञान और कौशल के साथ, कोई भी एक डिजाइन और निर्माण कर सकता है। इस लेख में, हम एक कदम आगे बढ़ेंगे और सीखेंगे कि सौर पैनल का उपयोग करके स्वचालित स्ट्रीट लाइट का डिज़ाइन और निर्माण कैसे करें।
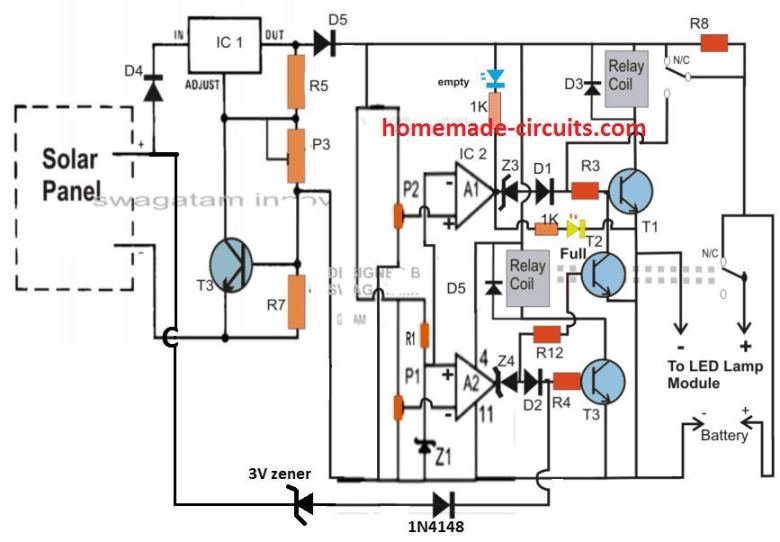
बिजली नियंत्रण के मामले में एक स्वचालित सौर ऊर्जा संचालित स्ट्रीट लाइट मानक सौर स्ट्रीट लाइट से अलग है। एक स्वचालित प्रणाली प्रकाशकों को अपने आप चालू और बंद करने की अनुमति देती है। मानक सेट अप के लिए मैन्युअल सक्रियण की आवश्यकता होती है और मानवीय त्रुटि के कारण, प्रभारी व्यक्ति इसे बंद करना भूल जाता है। स्ट्रीट लाइट सिस्टम में ऑटोमेशन का उपयोग ऊर्जा की खपत को कम करता है।
If you wish to design and construction of automatic street light, then let's first take a look at how to design one.
सौर पैनल का उपयोग करके स्वचालित स्ट्रीट लाइट का डिज़ाइन:
शुरुआत के लिए, आपको एक सौर पैनल, ल्यूमिनेयर, स्विचिंग यूनिट, बैटरी, चार्ज कंट्रोलर, एक इन्वर्टर, एक पोल और कुछ तारों या केबलों की आवश्यकता होगी।
सौर पैनलों का उपयोग करने वाली एक स्वचालित स्ट्रीट लाइट में निम्नलिखित विशेषताएं हैं:
सिस्टम शाम के समय ल्यूमिनेयर्स को चालू करता है और भोर में इसे बंद कर देता है
ल्यूमिनरीज़ बंद होने के बाद सिस्टम स्वचालित रूप से बैटरी चार्ज करना शुरू कर देगा
बैटरी का आकार निर्धारित अवधि के लिए आवश्यक चमक पर प्रकाश उत्पन्न करने के लिए आवश्यक शक्ति की मात्रा पर निर्भर करता है। दूसरी ओर, सौर पैनल का आकार बिजली की आवश्यकता (वाट क्षमता), दक्षता (रूपांतरण दर), प्राप्त सौर विकिरण और स्थान के जलवायु तापमान पर निर्भर करता है।
As for the charge controllers or regulators, their names suggest that they are used to control and regulate the flow of current into the batteries, ensuring that it maintains its maximum charging capacity. They also protect the battery from overcharging and overheating. Modern controllers come with sophisticated technologies such as the maximum power point tracker (MPPT) and Pulse width modulation (PWM), which can adjust the charging rate depending on the battery level.
Since energy stored in the battery is in the form of Direct Current (DC), you will need an inverter to convert it to Alternating Current (AC). You'll determine the length of your pole by considering the illumination intensity and the shade of the area. On the other hand, the size and length of your interconnecting cable rely on the amount of current required and the distance between the components, respectively.
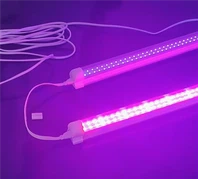
There are different types of luminaries you can choose from, such as LED lighting, incandescent, gas discharge, discharge, and metal halide lamps. The Automation of a solar-powered street light starts and ends at the switching unit. You will have to connect a control circuit to the switch so that the system can operate by the presence and absence of the sun.
शाम के समय, लाइट-सेंसिंग सर्किट बैटरी से ल्यूमिनरीज़ में करंट प्रवाहित होने देगा, जबकि भोर में, यह बैटरी को चार्ज करने का रास्ता बंद कर देता है। इस स्वचालित कार्य को प्राप्त करने के लिए, आपको एक ट्रांजिस्टर और एक सेंसर तंत्र की आवश्यकता होगी जिसे लाइट डिपेंडेंट रेसिस्टर (LDR) या एक फोटोडायोड या फोटोट्रांसिस्टर के रूप में जाना जाता है।
एलडीआर की सैद्धांतिक अवधारणा यह है कि यह एक ही समय में एक फोटोरेसिस्टर (सेंसर और रेसिस्टर के रूप में काम करता है) है। इसका प्रतिरोध इसकी सतह पर पड़ने वाले प्रकाश के आधार पर भिन्न होता है; प्रकाश की उपस्थिति प्रतिरोध को कम करती है और इसके विपरीत। यह अंधेरे में वृद्धि के कारण प्रतिरोध में वृद्धि है जो एक थ्रेशोल्ड वोल्टेज विकसित करता है जो ट्रांजिस्टर को सक्रिय करता है।
सौर पैनल का उपयोग करके स्वचालित स्ट्रीट लाइट का निर्माण
The construction stage is all about putting the design plan into action. It includes mounting the hardware and developing the base of the solar street light system. During the assembly process, your main focus should be to create a full-functioning automatic switching circuit. You should also build housings for the various components and provide insulation for electrical components.
Before you mount your components on the pole and fix the unit into the foundation, you'll need to do an experimental setup to verify that your system works. This testing process will help you verify the working condition of each component. After testing, you should be able to determine if the system is reliable in the supply of sufficient light at night.
प्रायोगिक सेटअप के बाद, आप शीर्ष पर सौर पैनल और उसके नीचे प्रकाश स्थिरता को माउंट कर सकते हैं, उनकी आवश्यक ऊंचाई को ध्यान में रखते हुए। सोलर मॉड्यूल फिक्स्चर माउंटिंग स्थायी नहीं होनी चाहिए क्योंकि झुकाव का समकोण प्राप्त करने के लिए आपको इसे समायोजित करने की आवश्यकता होगी।
आपके सौर स्ट्रीटलाइट सिस्टम के लिए घटकों की असेंबली जमीन से शुरू होनी चाहिए, और उसके बाद तारों का पालन किया जाएगा। कटऑफ सर्किट का निर्माण करते समय किसी प्रोग्रामिंग की आवश्यकता नहीं होती है; स्विच यूनिट में प्रतिरोधकों और ट्रांजिस्टरों को सही ढंग से रखने के लिए आपको बस थोड़े से विद्युत ज्ञान और कौशल की आवश्यकता है।
निर्माण चरण में आपको अधिक सहायता की आवश्यकता होगी, खासकर जहां आपको पूरी सौर स्ट्रीट लाइट इकाई उठानी होगी। पोल पर मुख्य घटकों को माउंट करने और नींव में सौर स्ट्रीट लाइट घटकों के साथ पोल लगाने के लिए आपको कुछ सहायक उपकरण और बन्धन उपकरण की आवश्यकता होगी।
इसलिए, यह सब सौर पैनलों का उपयोग करके स्वचालित स्ट्रीट लाइट के डिजाइन और निर्माण के बारे में है। अंत में, आप स्वचालित फ़ंक्शन का उपयोग करके ऊर्जा को बचाने और कुशलता से बचाने में सक्षम होंगे।